Sharing, Export, Sync
How to share calendar with a team
To share a specific calendar with a user, you must first transfer access to it.
Assign the user one of two calendar roles: Admin or User. Admins have the ability to make changes to the calendar, while users can only view it.
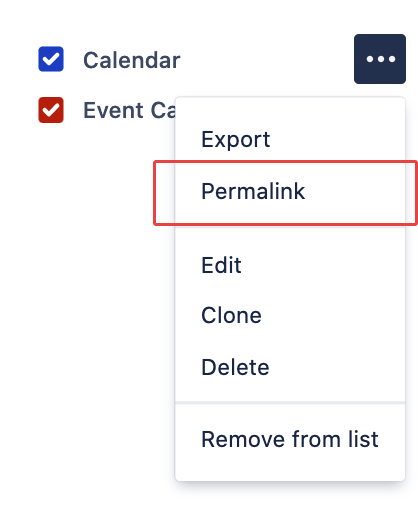
Once the user has been granted the appropriate permissions, use the "permalink" button located to the right of the calendar to generate a unique link. Share this link with your colleagues.
It is important to verify that the user has the necessary permissions to access the calendar by checking their "Calendar Users" global permissions in the system. Additionally, check the filter and issues permissions for any filter calendars, and ensure the user has access to the project(s) the calendar is built on for project and JQL calendars.
How to Export a Calendar to an External App
Exporting calendar items to mobile devices and third-party applications, such as Microsoft Outlook, Apple Calendar, and Google Calendar, is now available in Calendar for Jira. Follow these steps to enable this feature for your Jira instance:
Go to Settings -> Manage Apps -> DOITBETTER CALENDAR -> Export Settings to enable the export feature.
After enabling the export functionality, an "Export" button will appear at the top of your calendar details page.
When you click the Export button, a unique link will be generated for the calendar export, specific to the current user.
Use this generated link in your preferred calendar app, such as Google Calendar, Apple Calendar, or Outlook, to synchronize your Jira calendar with external services.
To Google Calendar:
On your computer, open Google Calendar.
On the left, next to "Other calendars," click Add From URL.
Enter the calendar's address.
Click Add calendar. The calendar appears on the left, under "Other calendars."
Tip: It might take up to 12 hours for changes to show in your Google Calendar.
To Apple Calendar:

In the Calendar app on your Mac, choose File > New Calendar Subscription.
Enter the calendar’s web address, then click Subscribe.
Enter a name for the calendar in the Name field, then click the adjacent pop-up menu and choose a color.
Click the Location pop-up menu, then choose an account for the subscription.
If you choose your iCloud account, the calendar is available on all your computers and devices that are set up with iCloud.
If you choose On My Mac, the calendar is saved on your computer.
To get the calendar’s event attachments or alerts, deselect the appropriate Remove checkboxes.
Click the Auto-refresh pop-up menu, then choose how often to update the calendar.
To prevent alerts from appearing for this calendar, select “Ignore alerts.”
Click OK.
To make changes later, click the name of the calendar, then choose Edit > Get Info.
To Office 365:

At the bottom of the page, select to go to Calendar.
In the navigation pane, select Import calendar.
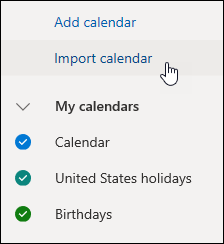
Under Import calendar, select From web.
Under Link to the calendar, type the URL for the linked calendar.
Under Calendar name, type the name you want to use for the calendar.
Select Import.