Calendars, Events, Customization
How to create a calendar in Jira Data Center
Click "Add Calendar" in the upper right corner of the screen.
Choose "Create" to create a new calendar.
Enter the following information about your calendar:
Name: The name of your calendar that will be displayed in the list of calendars when searching and other places.
Color: The color that events or issues on the calendar will be displayed in.
Calendar type: You can choose between three types of calendars: Basic, Project, or Filter.
Basic mode allows you to only display and create events.
Project mode allows you to select a specific project to display tasks.
Filter/JQL mode allows you to create a calendar using a JQL query. You can learn more about filters here.
Board mode allows you to select a specific Board (Jira Software needed) to display issues.
Event Start: This field determines when an event or task will start on the calendar. You can use both JIRA system fields and custom fields (date and DateTime) for this field. Note that directly editing this field depends on the ability to drag and drop issues on the calendar.
Event End (optional): This field indicates when an event or task is completed on the calendar. If this field is blank, any task will be displayed for a duration of one day.
Event Fields: These are the JIRA fields that should be displayed on the calendar.
Event info fields: These are the JIRA fields that should be displayed on the calendar when you hover over an event.
Click "Create" to create your calendar.
How to edit a calendar in Jira Data Center
To edit a calendar, you can make changes to the calendar's name, hide certain event fields, or change the calendar's permissions. To do this, you must have sufficient permissions. Additionally, you can add custom event types and hide default event fields to customize the calendar to your needs.
Here's how to edit a calendar:
Click on the calendar name.
Click on the right of the calendar name and choose "Edit"
Make the necessary changes to the calendar's name or other information.
How to add Existing calendar
To add an existing calendar in JIRA, follow these steps:
Click "Add Calendar" in the upper right corner of the screen.
Click "Add existing".
Enter the name of the calendar you want to add in the provided field, or select it from the dropdown list. Note: You will only see calendars that you have access to.
Click "Add" to add the existing calendar.
How to subscribe to external calendar / ICAL import to Calendar for Jira
You can subscribe to Internet calendars in the Ical format if they are accessible from the server of your JIRA instance. To do this, follow these steps:
Make sure that the Internet calendars you want to subscribe to are in the Ical format and are accessible from the server of your JIRA instance.
In JIRA, click "Add Calendar" in the upper right corner of the screen.
Click "Add calendar subscription".
Enter the URL of the Internet calendar you want to subscribe to in the provided field.
Click "Add" to subscribe to the Internet calendar.
How to create Event in the “Calendar for Jira"
To add events to your calendar, follow these steps:
Select the "Add Event" button or double-click on the calendar view
Enter a name for the event
Choose the calendar on which the event should be created
Select a type for the event from the drop-down menu
Specify the start and end dates for the event
Select any users who will participate in the event
Select the issues on which the events depend. The events will be displayed in the issue sidebar.
Click "Create" to add the event to your calendar.
How to create Recurring events in the “Calendar for Jira"
With the ability to create recurring events, it's easy to schedule meetings, reminders, and more on a regular basis.
To add a recurring event:
Select the "Add Event" button or double-click on the calendar view
Enter a name for the event
Choose the calendar on which the event should be created
Select a type for the event from the drop-down menu
Specify the start and end dates for the event
Choose the option to set the frequency of the event's recurrence, such as daily, weekly, monthly, yearly, or custom.
Select an option for when the recurrence should end or leave it as "endless"
Select any users who will participate in the event
Click "Create" to add the event to your calendar.
How to color issues by conditions
You can set up custom color coding for tasks on all calendars (except basic) based on specific criteria, such as highest priority tasks, tasks assigned to specific individuals, tasks from a specific person, front-end tasks, etc. This way, all users with access to the calendar will be able to see the color coding based on the defined conditions.

To set up conditional colors on a calendar:
Create or edit an existing calendar.
Navigate to the "Conditional Colors" tab.
Select the desired condition and choose the color to assign to tasks that meet that condition.
Click "Edit" or "Create".
Note: The colors set will be visible to all users who access the calendar. If you want to create your own colors, you can use the user conditional colors feature.
How to delete/remove calendar
To delete or remove a calendar, there are two options available: removing it from your view or deleting it completely.
To remove a calendar:
Locate the calendar in the calendar list.
Click the three dots to the right of the calendar name and select "Remove from list."
To delete a calendar:
Locate the calendar in the calendar list.
Click the three dots to the right of the calendar name and select "Delete."
Confirm the deletion. Please note that this action is permanent and will delete the calendar for all users."
How to create a default calendar in Jira Data Center
Overview:
Default calendars in Jira can be added to all users of the system or specific groups. They are useful for ensuring that certain calendars are available to specific departments or teams without the need for manual additions. In this article, we will explore what default calendars are, provide examples of their usage, and explain how to create them.
What are Default Calendars?
Default calendars are calendars that can be forcibly added to all users of the system or specific groups. They are useful for ensuring that specific calendars are available to certain teams or departments without the need for manual additions.
Examples: Here are some examples of how default calendars can be used:
Marketing Calendar: The marketing calendar must be available to the entire marketing department. By creating a default calendar, there is no need to add the necessary calendars to each newly hired marketer manually. Jira will add the calendar to them.
Study Calendar: If you are a teacher, you may want all students to have a fresh schedule on their calendars. You can add a training calendar for all your students by creating a default calendar.
How to Create a Default Calendar?
To create a default calendar in Jira, you will need administrative rights. Here are the steps to follow:
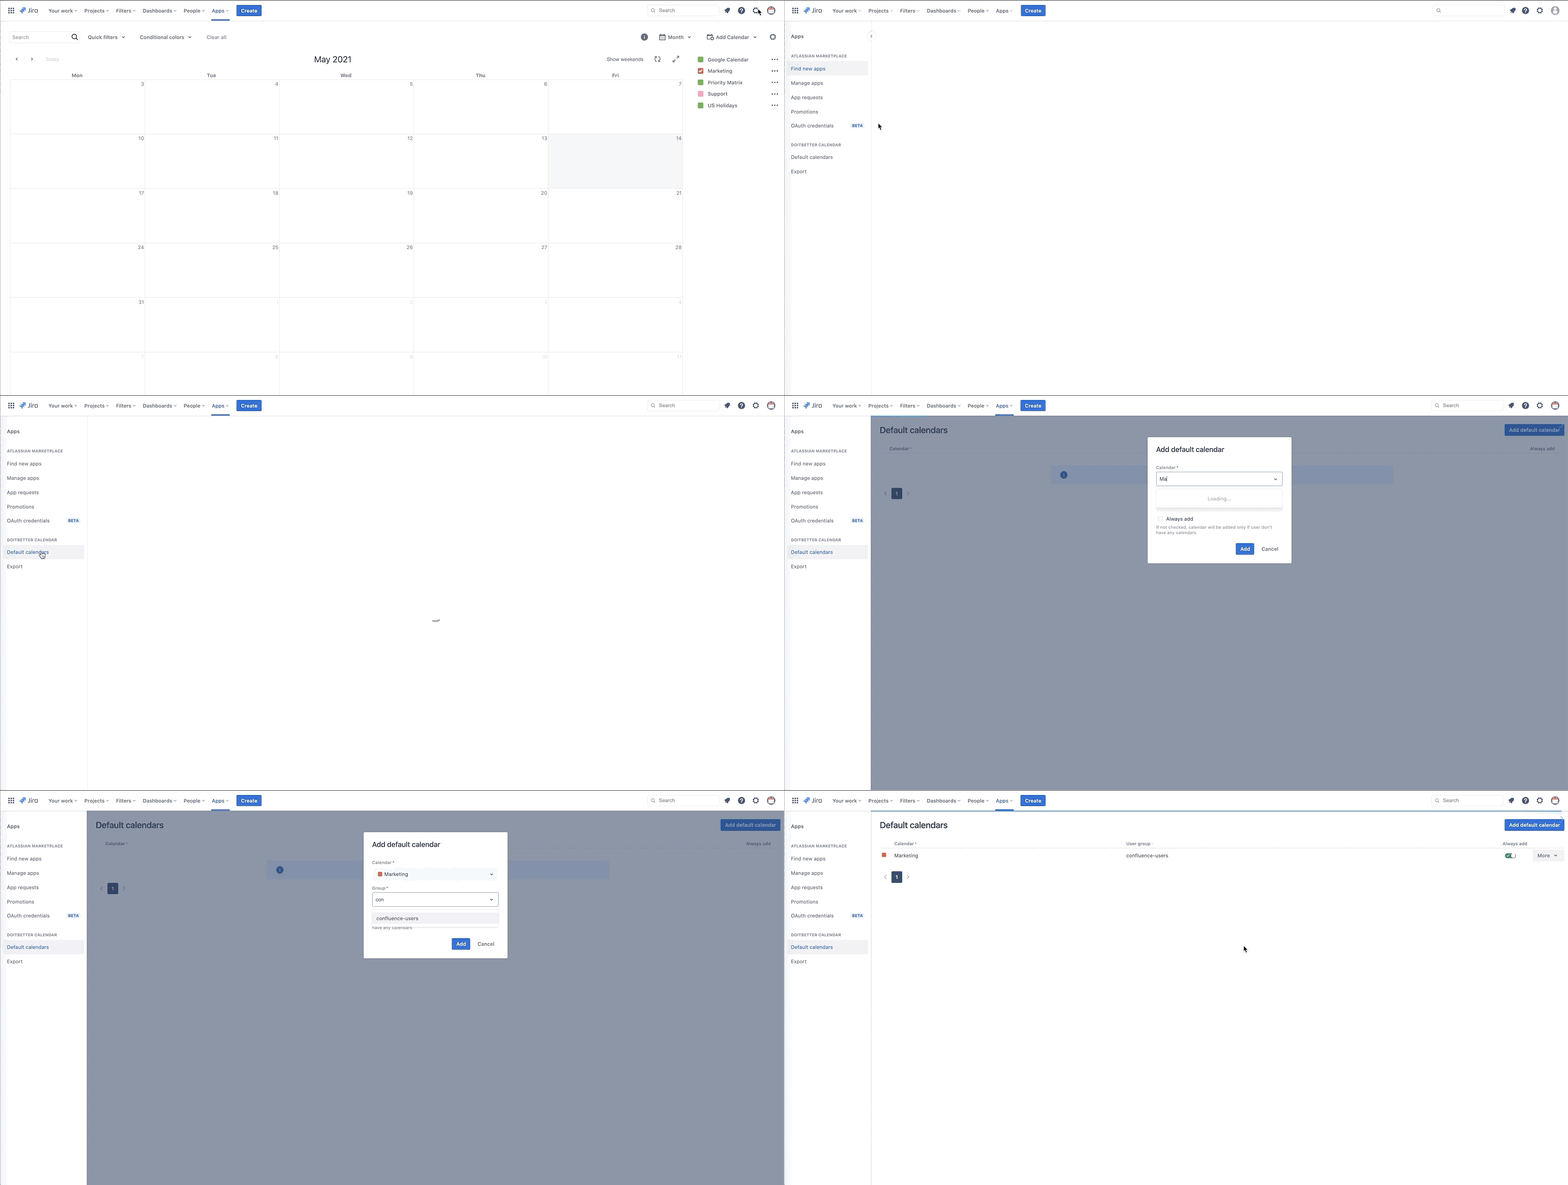
Go to System->Apps->DOITBETTER CALENDAR->Default calendars
Click “Add default calendars"
Select a calendar and a group to whom you want to add it.
The "Always add" checkbox allows users who already have calendars to add default calendars. If you do not click it, the calendar will be added only to users without calendars.

By following these simple steps, you can create default calendars in Jira, ensuring that specific calendars are available to your teams or departments without any manual intervention.
Displaying project versions
Jira versions represent specific points in time for a project and help to organize work by providing milestones to work towards. You can assign issues in your project to specific versions and plan sprints around completing work for that version. The versions can be displayed on the calendar to keep an eye on release information and compare it with actual issues and their statuses. As the release date approaches, you can always see what is ready and what is not. You can also access the Release Summary page with one click. Currently, versions can only be displayed on the project calendar. To display versions on a calendar:
While creating or editing a calendar, check the "Display project versions" option.
Click "Edit" to save the new configuration. If you need additional functionality, please contact us at info@doitb.com and we will discuss and implement it for you."
